Highlights:
Shade taking with photos
6/9/23
By:
Jerry Ragle, CDT
A photo will never give the exact shade but it will show how well the shade guide matches as long as you follow these steps.

Quick Workflow
Best to take the shade first thing and not wait until after prep, impression, scan, etc. Teeth will dehydrate, some more than others. When this happens teeth can be off a half to one shade too light, or start to show decalcification when actually not there. If the shade is taken last thing, patient should close for up to one hour for teeth to fully rehydriate.
1st photo prior to prepping:
This is when to take the shade
2nd photo after temp:
Teeth are still very dehydraited
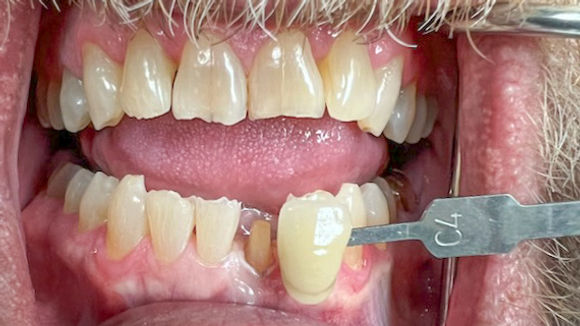
When taking a shade always hold the guide even with the facial plane of the tooth or teeth being matched. As pictured, too far forward, the flash will brighten the shade guide. The same applies if the guide is held too far back, or behind the teeth, the shade guide will then darken. When the guide is held on the same plane the light will then relfect the same giving a more accurate correlation to the teeth being matched.
Make sure the subject is in focus, if not retake the photo.
Always send photos in hi-res, 1mg or higher. Do not send as a thumbnail, 56kb, as an example, or screenshots.
Use the photo uploader at https://ragledental.com/services/photo-dicom-submission/
Full Instructions for Dental Assistants on Taking a Shade
Purpose
Accurate shade selection is crucial for creating dental restorations that match the natural teeth of patients. This guide outlines the steps for effectively taking a dental shade.
Preparation
1. **Lighting Conditions:**
- Use natural light when possible.
- Avoid bright overhead lights that can alter the perception of color.
- Use a color-corrected light source if natural light is not available.
2. **Patient Preparation:**
- Seat the patient upright with the mouth at eye level.
- Remove any lipstick, bright-colored clothing, or accessories that might affect color perception.
- Ensure the teeth are clean and free from any debris or plaque.
3. **Tools Required:**
- Shade guide (e.g., Vita Classic or Vita 3D Master).
- Mirror.
- Moist gauze or cotton roll.
Shade Selection Procedure
1. **Initial Assessment:**
- Perform a quick initial assessment of the tooth to be matched. Take a preliminary look without focusing too hard, as the human eye can become fatigued quickly.
2. **Hydrate the Tooth:**
- Ensure the tooth is hydrated by having the patient rinse with water. Dehydrated teeth can appear lighter in color.
3. **Using the Shade Guide:**
- Select the shade guide tabs that appear closest to the patient's natural tooth color.
- Hold the shade guide next to the tooth, ensuring the tabs are at the same level as the tooth to avoid shadows.
4. **Comparing Shades:**
- Compare the middle third of the tooth to the shade tabs, as this is typically the most accurate area for color matching.
- Use a neutral background, such as gray or a neutral-colored napkin, to minimize external color influences.
5. **Selecting the Shade:**
- Narrow down to 2-3 shades that seem the closest match.
- Look away and then back at the teeth and shade guide to confirm the choice. Repeat this step a few times to ensure accuracy.
6. **Final Decision:**
- Make the final decision based on the consensus of the closest matching shade. If in doubt, select a slightly lighter shade as it can be easier to darken a restoration than to lighten it.
Documentation
1. **Record the Shade:**
- Document the selected shade in the patient's chart accurately.
- Note any additional observations or special instructions for the dental laboratory, such as specific areas that require custom shading or staining.
2. **Communicate with the Dental Laboratory:**
- If applicable, take photographs of the tooth with the selected shade tab for the lab technician's reference.
- Provide any additional details that may help in creating a more accurate restoration.
Tips for Accurate Shade Matching
- **Avoid Eye Fatigue:**
- Limit the shade-matching process to no more than 5-7 seconds at a time. Take breaks to avoid eye fatigue, which can affect color perception.
- **Use the Patient's Natural Tooth as a Guide:**
- Compare the shade tab with the patient's adjacent teeth for a more holistic match.
- **Verify Under Different Lighting:**
- Check the selected shade under different lighting conditions if possible to ensure consistency.
Follow-Up
1. **Re-Evaluation:**
- Once the restoration is received, compare it to the natural teeth again before final cementation. Make adjustments if necessary.
2. **Patient Feedback:**
- Ensure the patient is satisfied with the color match and make any necessary adjustments.
By following these detailed steps, dental assistants can ensure an accurate and aesthetically pleasing shade match, contributing to successful dental restorations and patient satisfaction.


Latest News


